Monday, July 20, 2009

Floor & Ceiling

Hey Ladies,

Just wanted to post real quick. I have had a number of emails about the ceiling and floors, and I thought it would be easiest just to post on here.

The ceiling was done using bead board, and we covered up the seams from the butted ends using 4X4's. We used a hatchet and roughed up the sides a bit and stained them both with Early American stain by Minwax. It really was a pretty easy fix for that nightmare of a ceiling.

The floor was done using 1x10 pine boards... Yup, that is right. Pine Boards!! It's funny because we tend to think of wood floors as hardwood, and when I started researching old wood floors I found out that our ancestors used pine for their flooring. I would not have thought of pine on the floor because I always assumed wood floors were hardwood, but they are not always hardwood. If a home that is 100-200 years old still has it's pine wood floors after all these years,
then I think my pine floors will last through my lifetime. :)

We made sure to biscuit join one board to another for a nice tight fit, and Ed screwed each board to the floor joist to help with any shifting and buckling. We then used wood plugs to cover the screw holes. We sanded the floor, and then I applied one coat of the Early American stain. I put on 4 coats of the floor poly as the manufacturer suggested. That stuff was easy to apply and I only had to wait 2 hours in between coats. After the last coat I had to wait 24 hours before I could walk on it.It dries to a nice hard protective surface and there is very little shine. I don't like shine.. :)

There is a number of ways to lay wide plank flooring for the average DIYer, and this was the easiest way for us to do it. If you do a Google search you can find directions on how to lay wide plank pine floors.

I cannot say enough how much I love these floors. I have always wanted wide plank floors, and figured I would have to settle for the narrow hardwood floors that you buy at your local home improvement stores until I started looking into it!!!
Pine floors have so much more character then hardwood floors do. Don't get me wrong, I love hardwood floors, but the look I was going for is better achieved with the wide plank pine.

Thank you all for your kind and encouraging words. I really do appreciate you all taking the time to look and leave comments. Enjoy the rest of your Monday!


Sunday, July 19, 2009

Before & After Pics Of Remodeled Dining Room

Happy Sunday Morning,

The Dining Room is finally finished!!! YIPPY!!!
Well at least 99% of it is finished. If you would all indulge my ramblings, I would love to give a bit of background on our remodel and share the before and after photos with you all. WARNING... This will be a long read. You can skip to the pictures if you want, but I hope you will take the time to read. There is a lot of blood, sweat and tears that go into a do-it-yourself remodel.

We bought this house 3 years ago. It was built in 1970, and it has never been updated. The kitchen, when we moved in was done in that wonderful 70's Green!!! Ugly!!!!
The counter were green, the sink was green,the mini blinds hanging on the window over the sink was GREEN!!!! When we pulled up the floor, yes you guessed it, the linoleum under it was GREEN!! The cabinets were that real dark wood that was popular during the 70's.
Well, I saw potential in this never updated home, and it had good bones, and the possibility of the one thing I always wanted.......A Fireplace in the kitchen!!!

There was a little den just off the kitchen with a fireplace. I remember the first time we came and looked at the house. I stood in the doorway between the kitchen and den, and tried to visualize the wall removed, and the kitchen enlarged to include that little den with the fireplace! Yup, I was sold!! I can look past paint, and wallpaper. I can even look past walls that shouldn't be there...lol!!
I could see the potential of what this house could be.

We started the remodel about 2 years ago, but we didn't start with just one room....Noooo, we decided lets do the whole upstairs at once, excluding bedrooms..
I'm not talking paint a few walls, and change a few things in one room. I'm talking 4 rooms...walls torn down,stairs ripped out, electrical moved and rerouted, flooring torn up, and once the gutting was done, and we had a big empty shell for a home, we had to start the rebuilding. I tried to be realistic, and thought it would take us 6 months to a year to remodel..... lol... that is funny!!! Two years later and we now have one room finished. I am not complaining.... I am thrilled to have that one room done!!! After living with sub floors that you can't walk barefoot on, or you WILL get a splinter, sheet rocked walls with half finished tapping & mudding, that you can't decorate, light switches that don't work and the MESS.... Well lets just say I am seeing the light at the end of the tunnel, and it is worth all the chaos and turmoil.

I have the best husband anybody could ask for, and he is a pretty handy guy to have around. Ed has done all the construction of our remodel. He has had helpers.The kids and me! :)
He has had to make new stairs and cut a big old hole in my kitchen floor(talk about nail biting) for the new stairs, he had to take down a LOAD BEARING wall!!!! That was a very scary day! When he and Adam removed the last upright to put the braces in, that whole ceiling dropped a good 2 to 3 inches....For a split second I thought we were all goners. I really thought the whole roof was going to come crashing down on us all. Thankfully he knows what he is doing, and I just worry way to much.
Ed built another wall in our dining area with pocket walls, so I could have the pocket doors I dreamed of. He did all the wiring and rewiring for new light fixtures, outlets and light switches. He and the boys laid down all the wide plank flooring in three rooms. That was big job...They cut each board to length, biscuit joined each and every plank one to another,screwed the flooring down, and wood plugged all the holes. I got the job of staining and polyurethaning the floors. He continues to build all our kitchen cabinets, cupboards, island, and whatever else I dream up!!! :)

We have had our fare share of mishaps along the way, and the layout of our remodel has had to be changed a few times,but we have rolled with the changes, and I couldn't be happier with the way everything is finally shaping up.


I only have a few before pictures of the dining room, and they actually are not even before pictures. In these pictures Ed had already torn down the wall that separated the dining room and front room, built the pocket walls, laid down the floor, and did the sheet rock.

Take a look at this ceiling. I'm not a big fan of pop-corn ceiling. Please don't get offended if you are. Just not my thing, and that's what makes us all individuals. Now maybe I could live with pop-corn ceilings if I absolutely had to, but what I can't live with is pop-corn ceilings with glitter!!!!! Yes, I said glitter. I have never seen glitter sprayed into the ceilings before, and this house has it in just about every room!! There was NO WAY we were going to scrape these ceilings!! Could you imagine the mess, and the amount of time it would take? We debated putting sheet rock over the old ceiling like we did in the kitchen, but I had another idea, and I must say it was not met with much enthusiasm!!! I Love the finished look, and so does everybody else. What do you all think????

Before with glitter pop-corn ceiling..


During pictures...


After pictures...


Okay, here is a few more of the before/during pictures..


After pictures... We still need to put up the ceiling trim, and I am still debating a chair rail. I have gone back and forth about the chair rail. I am leaning toward it with a small amount of stenciling above the rail, but then I think it will look to busy in there. It is a small room. Any opinions would be appreciated.


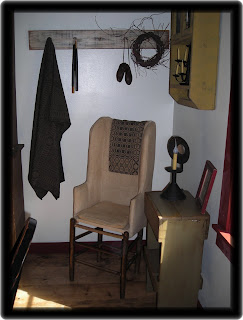


We painted the walls Woodrow Wilson Linen, all the trim, doors are done in Country Red from Olde Century paint, and we used Early American Minwax stain on the floors and ceiling.


I still have some tweaking to do in here. I want to put a corner table below the hanging corner cupboard, either a rug or floor cloth beneath the table, and few other things I want to change around, but all in all I am very pleased with the finished product. Thanks for looking, and have a great week!


Wednesday, July 15, 2009

What you working on Wednesday..


Hi There Everyone!

Well I have been out straight trying to get the dining room finished. I posted about it a couple weeks ago hoping Ed would get a chance to finish up that one room while he was home. He did get a lot done before he had to head back out, and the boys and I have been busy the last two weeks trying to get it finished. I wanted to post some before and after pictures, which I'm hoping to do by the end of the week, so check back in a couple days. :)

Anyways, I have been trying to get my Make Do chair finished to put in the dining room, and finally got it all finished today.
I have had the ladder back for years and have been trying to figure out how to make the make do for about a year now. I did a lot of research, and really found very little on how to construct them. I study what pictures I came across, and thought I finally had it figured out. It was a bit difficult, but I am happy with the way it turned out. I made some mistakes on it, but will know better next time...if there is a next time ... :)


Well I think that's about it. I did finish up some bird pincushions I was working on too. I wanted them for the hanging corner cupboard in the dining room. I'll have to go take some pictures so you can all see them.
Thanks for taking a peek, and have a blessed day!

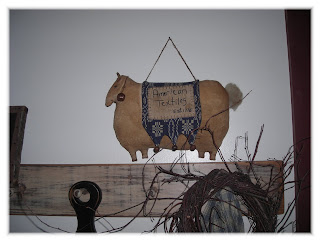
Okay ladies, I just took a couple pictures of my bird pincushions, and I forgot I finished up a hanging sheep over the weekend. I used a Kentucky Primitive pattern for the sheep.


I love all my birdies, but these two are my favorites!


Here is the sheep. Don't you just love his fat little body and stumpy legs!!


Saturday, July 4, 2009

And The Winner Is.............................


As we wrap up our celebration of the 4th of July, we have one last thing to do, and that is draw the winning name for our giveaway.
I want to thank you all who participated. Those who are now followers, and those who blogged about the giveaway, and to all the wonderful comments that were left.
I wish there could be more then one winner, but don't worry, I will be doing more giveaways in the near future.


I had Anna Grace draw the name out of the bowl. She was so very excited about getting to draw the winning name. She was clapping her hands and squealing, and after the name was picked she wanted to know what present she was getting!!! lol.. :)
Poor baby... I had to go find a piece of gum in my purse for her, so she wouldn't be disappointed.
Anyways, on with the winning name.........


and the winner is Teresa M from Teresa's Primitive Treasures!!
Congratulations Teresa!! Send me an email with your mailing address and I'll have your flag, pinwheels and bowl fillers shipped out to you asap.

HAPPY INDEPENDENCE DAY!!


Happy Birthday America!
Today we mark the 233rd year of our birth as a nation!


As we attend our barbecues, parades, firework displays, and parties, let us take time to remember what it is we are celebrating.
233 years ago we as a people Declared our Independence from Great Britain.


As we celebrate our Nations Birthday it's important we remember the sacrifice behind this great day...

Five signers were captured by the British as traitors, and tortured before they died.

Twelve had their homes ransacked and burned. Two lost their sons serving in the Revolutionary Army; another had two sons captured. Nine of the 56 fought and died from wounds or hardships of the Revolutionary War.

They signed and they pledged their lives, their fortunes, and their sacred honor. What kind of men were they?

Twenty-four were lawyers and jurists. Eleven were merchants, nine were farmers and large plantation owners; men of means, well educated. But they signed the Declaration of Independence knowing full well that the penalty would be death if they were capture.

These were not wild-eyed, rabble-rousing ruffians. They were soft-spoken men of means and education. They had security, but they valued liberty more. Standing tall, straight, and unwavering, they pledged: “For the support of this declaration, with firm reliance on the
protection of the divine providence, we mutually pledge to each other, our lives, our fortunes, and our sacred honor.” They gave you and me a free and independent America.


Throughout the history of our nation brave men and women have given the ultimate sacrifice. They have laid down their lives for us all.


Let us remember their sacrifices, and the sacrifice their families have made also.
We enjoy the freedoms and liberties we have because of them all. Past, present and future..


Some of us take these liberties so much for granted, but we shouldn’t. So, take a few minutes while enjoying your 4th of July holiday and silently thank these patriots. It’s not much to ask for the price they paid.


Have a Happy, Safe, and Wonderful 4th of July!!!!