Happy Sunday Morning,
The Dining Room is finally finished!!! YIPPY!!!
Well at least 99% of it is finished. If you would all indulge my ramblings, I would love to give a bit of background on our remodel and share the before and after photos with you all. WARNING... This will be a long read. You can skip to the pictures if you want, but I hope you will take the time to read. There is a lot of blood, sweat and tears that go into a do-it-yourself remodel.
We bought this house 3 years ago. It was built in 1970, and it has never been updated. The kitchen, when we moved in was done in that wonderful 70's Green!!! Ugly!!!!
The counter were green, the sink was green,the mini blinds hanging on the window over the sink was GREEN!!!! When we pulled up the floor, yes you guessed it, the linoleum under it was GREEN!! The cabinets were that real dark wood that was popular during the 70's.
Well, I saw potential in this never updated home, and it had good bones, and the possibility of the one thing I always wanted.......A Fireplace in the kitchen!!!
There was a little den just off the kitchen with a fireplace. I remember the first time we came and looked at the house. I stood in the doorway between the kitchen and den, and tried to visualize the wall removed, and the kitchen enlarged to include that little den with the fireplace! Yup, I was sold!! I can look past paint, and wallpaper. I can even look past walls that shouldn't be there...lol!!
I could see the potential of what this house could be.
We started the remodel about 2 years ago, but we didn't start with just one room....Noooo, we decided lets do the whole upstairs at once, excluding bedrooms..
I'm not talking paint a few walls, and change a few things in one room. I'm talking 4 rooms...walls torn down,stairs ripped out, electrical moved and rerouted, flooring torn up, and once the gutting was done, and we had a big empty shell for a home, we had to start the rebuilding. I tried to be realistic, and thought it would take us 6 months to a year to remodel..... lol... that is funny!!! Two years later and we now have one room finished. I am not complaining.... I am thrilled to have that one room done!!! After living with sub floors that you can't walk barefoot on, or you WILL get a splinter, sheet rocked walls with half finished tapping & mudding, that you can't decorate, light switches that don't work and the MESS.... Well lets just say I am seeing the light at the end of the tunnel, and it is worth all the chaos and turmoil.
I have the best husband anybody could ask for, and he is a pretty handy guy to have around. Ed has done all the construction of our remodel. He has had helpers.The kids and me! :)
He has had to make new stairs and cut a big old hole in my kitchen floor(talk about nail biting) for the new stairs, he had to take down a LOAD BEARING wall!!!! That was a very scary day! When he and Adam removed the last upright to put the braces in, that whole ceiling dropped a good 2 to 3 inches....For a split second I thought we were all goners. I really thought the whole roof was going to come crashing down on us all. Thankfully he knows what he is doing, and I just worry way to much.
Ed built another wall in our dining area with pocket walls, so I could have the pocket doors I dreamed of. He did all the wiring and rewiring for new light fixtures, outlets and light switches. He and the boys laid down all the wide plank flooring in three rooms. That was big job...They cut each board to length, biscuit joined each and every plank one to another,screwed the flooring down, and wood plugged all the holes. I got the job of staining and polyurethaning the floors. He continues to build all our kitchen cabinets, cupboards, island, and whatever else I dream up!!! :)
We have had our fare share of mishaps along the way, and the layout of our remodel has had to be changed a few times,but we have rolled with the changes, and I couldn't be happier with the way everything is finally shaping up.
I only have a few before pictures of the dining room, and they actually are not even before pictures. In these pictures Ed had already torn down the wall that separated the dining room and front room, built the pocket walls, laid down the floor, and did the sheet rock.
Take a look at this ceiling. I'm not a big fan of pop-corn ceiling. Please don't get offended if you are. Just not my thing, and that's what makes us all individuals. Now maybe I could live with pop-corn ceilings if I absolutely had to, but what I can't live with is pop-corn ceilings with glitter!!!!! Yes, I said glitter. I have never seen glitter sprayed into the ceilings before, and this house has it in just about every room!! There was NO WAY we were going to scrape these ceilings!! Could you imagine the mess, and the amount of time it would take? We debated putting sheet rock over the old ceiling like we did in the kitchen, but I had another idea, and I must say it was not met with much enthusiasm!!! I Love the finished look, and so does everybody else. What do you all think????
Before with glitter pop-corn ceiling..

During pictures...

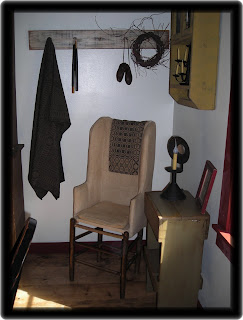
After pictures...

Okay, here is a few more of the before/during pictures..


After pictures... We still need to put up the ceiling trim, and I am still debating a chair rail. I have gone back and forth about the chair rail. I am leaning toward it with a small amount of stenciling above the rail, but then I think it will look to busy in there. It is a small room. Any opinions would be appreciated.


We painted the walls Woodrow Wilson Linen, all the trim, doors are done in Country Red from Olde Century paint, and we used Early American Minwax stain on the floors and ceiling.
I still have some tweaking to do in here. I want to put a corner table below the hanging corner cupboard, either a rug or floor cloth beneath the table, and few other things I want to change around, but all in all I am very pleased with the finished product. Thanks for looking, and have a great week!


